Keywords: Host a local web-site on your Windows XP / Windows 7 System, install IIS on Windows XP Pro, install IIS on Windows 7
If you want to Host a local web-site on your Windows XP / Windows 7 System you will need a web-server to serve your web-pages.
Windows XP Pro and above comes with IIS pre-packed in your CD/DVD. But you have to install it manually as it’s not default installed program of Windows. You may use any other freely available web-server to host your web-site but I’m going to show installation of IIS on Windows XP Pro/ Windows 7 as it also provides other utilities as well. You will require your Windows XP Pro CD / Windows 7 DVD to proceed further.
Follow these step to install IIS on Windows XP Pro:
1. Place the Windows XP Professional CD-Rom into your CD-Rom Drive.
2. Go to ‘start’ and then control panel.
3. Click on ‘Add/Remove Programs’ .
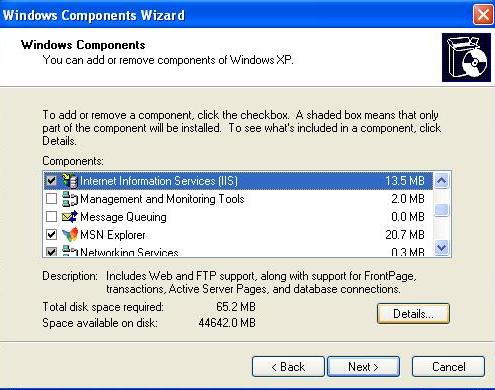
4. Open ‘Add/Remove Windows Components’.
5. Place a tick in the check box for ‘Internet Information Services (IIS)’ leaving all the default installation settings intact. And click on “Details”.
6. Place a tick on “world wide web service” , if not already ticked. Then click ‘Next’ and IIS will start to install on system.
7. Once IIS is installed on your machine, you will find a directory Inetpub in your C:\ drive.
8. In this directory you will see another directory named as ‘wwwroot’, download attached files here and put them into this directory, but if you don’t want to over write the IIS documentation found in this directory you can set up your own virtual directory through the ‘Internet Information Services’ console.
9. After completing above steps, open your internet browser and type
It should open a web-page like below picture.
If you can see it, Great.. you have running a web-server on your windows machine. Add as many pages you want, put them into same directory and start building your website… 🙂
Follow these step to install IIS on Windows 7:
1. Place the Windows 7 DVD into your DVD Rom Drive.
2. Go to ‘start’ and then control panel.
3. Click on ‘Programs’ .
4. Click ‘Turn Windows features on or off’.
5. Place a tick in the check box for ‘Internet Information Services (IIS)’ leaving all the default installation settings intact. Expand the tree and tick World Wide Web Services”.
6. Then click ‘Ok’ and IIS will start to install on system.
Congratulations…..!!! .. 🙂 You have learnt how to install IIS on Windows XP / install IIS on Windows 7 and Host a local web-site on your Window XP/ Windows 7 System.
Note: If you have query regarding any step or get any error please leave a comment. Share and Like it if you find it useful… 😉


I got this website from my friend who informed me on the topic of this web site and now this time I am browsing this website and reading very informative articles at this place.
http://webhosting.affiliatblogger.com/is_it_time_to_shift_to_dedicated_webhosting.php
Great, Would it make our system as a sever? Can web page be accessed by other as usual in www?
No, It wont make your system as a complete server. But it’ll run a web-server to host your web-site.
If your system on a LAN then other users of same network can view your web-site(if your firewall is no blocking them … 😉 ) by your ip-address.